

Monday, 22 June 2015
Moon Landing
Hey Everyone. Not a review this time but I wanted to share this small diorama. It is of the Moon landing with a astronaut figure from a old Revell lunar lander. I created the base by Gluing sand to a piece of MDF and then spray painting it. Thanks for looking at my blog! Subscribe to my blog to read all my reviews first! Please comment Below!

Sunday, 14 June 2015
Junkers JU87B/R Stuka
Hello Again. Welcome to another review on Rhod's Models! Today I will be reviewing the Stuka. The Stuka was a German Dive Bomber Plane which was put into Luftwaffe Service in 1937. The Stuka was usually used for Close air support for ground forces and was used during the invasion of Poland and France, However the earlier version of the Stuka had heavy losses during the Battle of Britain. A later Version of the Stuka was used by the Italians and the Germans from Europe to the Middle East and it now had a longer range and a drop tank beneath each wing. The plane also had two 7.9mm MG 17 Machine guns in the wings and a 7.9mm MG 15 Machine gun in the rear of the cockpit.
This is the Airfix 1:72 Version. However I cannot find this on the Airfix Website so it might be out of production. But it is sold on Amazon for a large price of £17.73.
The Instructions of the Kit are easy to follow and include the old tooling. I usually put on the decals after the build is finished, but on this model one of the large Luftwaffe decals on the underside of the wing needs to be put on before a piece. However this is not very clear at all in the instructions.The cockpit of the plane I thought needed a lot more detail. For instance the seat of the rear pilot was joined to the floor already and was just a simple box. The area next to his feet was also not closed off to the rear of the fuselage. The rest of the plane is absolutely covered and I mean covered in Bolts. This works really well if you use Humbrol DecalFix as I have for the large Decals.
The join lines, I found, needed a lot of model Filler and sanding. Even after that cracks were still visible. This leads on to say that the Cockpit Canopy fitted Poorly to the rest of the fuselage. The wings were also not very well fitting. The kit comes with two Paint schemes (Luftwaffe in France, August 1940 or the Italian Air force in Greece, April 1941) They Both came with enough decals but some decals were not mentioned in the instructions. You have to be careful with this kit if you want it to be perfect as Airfix gives you options for the bombs, But its not very clear which bombs go with which paint scheme. For instance I have only just realised while writing this review that I have got the options mixed up. So overall not a great kit but worth a try and it could be done to a high finish.
Thanks For reading my Blog! Subscribe by email or through blogger to read my reviews first! Please comment below.


Saturday, 13 June 2015
Have you ever Laughed at a Model?
Modelling to many people is dull. I don't think so and if your'e reading this you must agree that it isn't. But can a Model be funny? Can a Model prove or make a point? Art can prove a point, be funny or question an idea, but can a Model? Please Comment Below with Your views about the Topic!
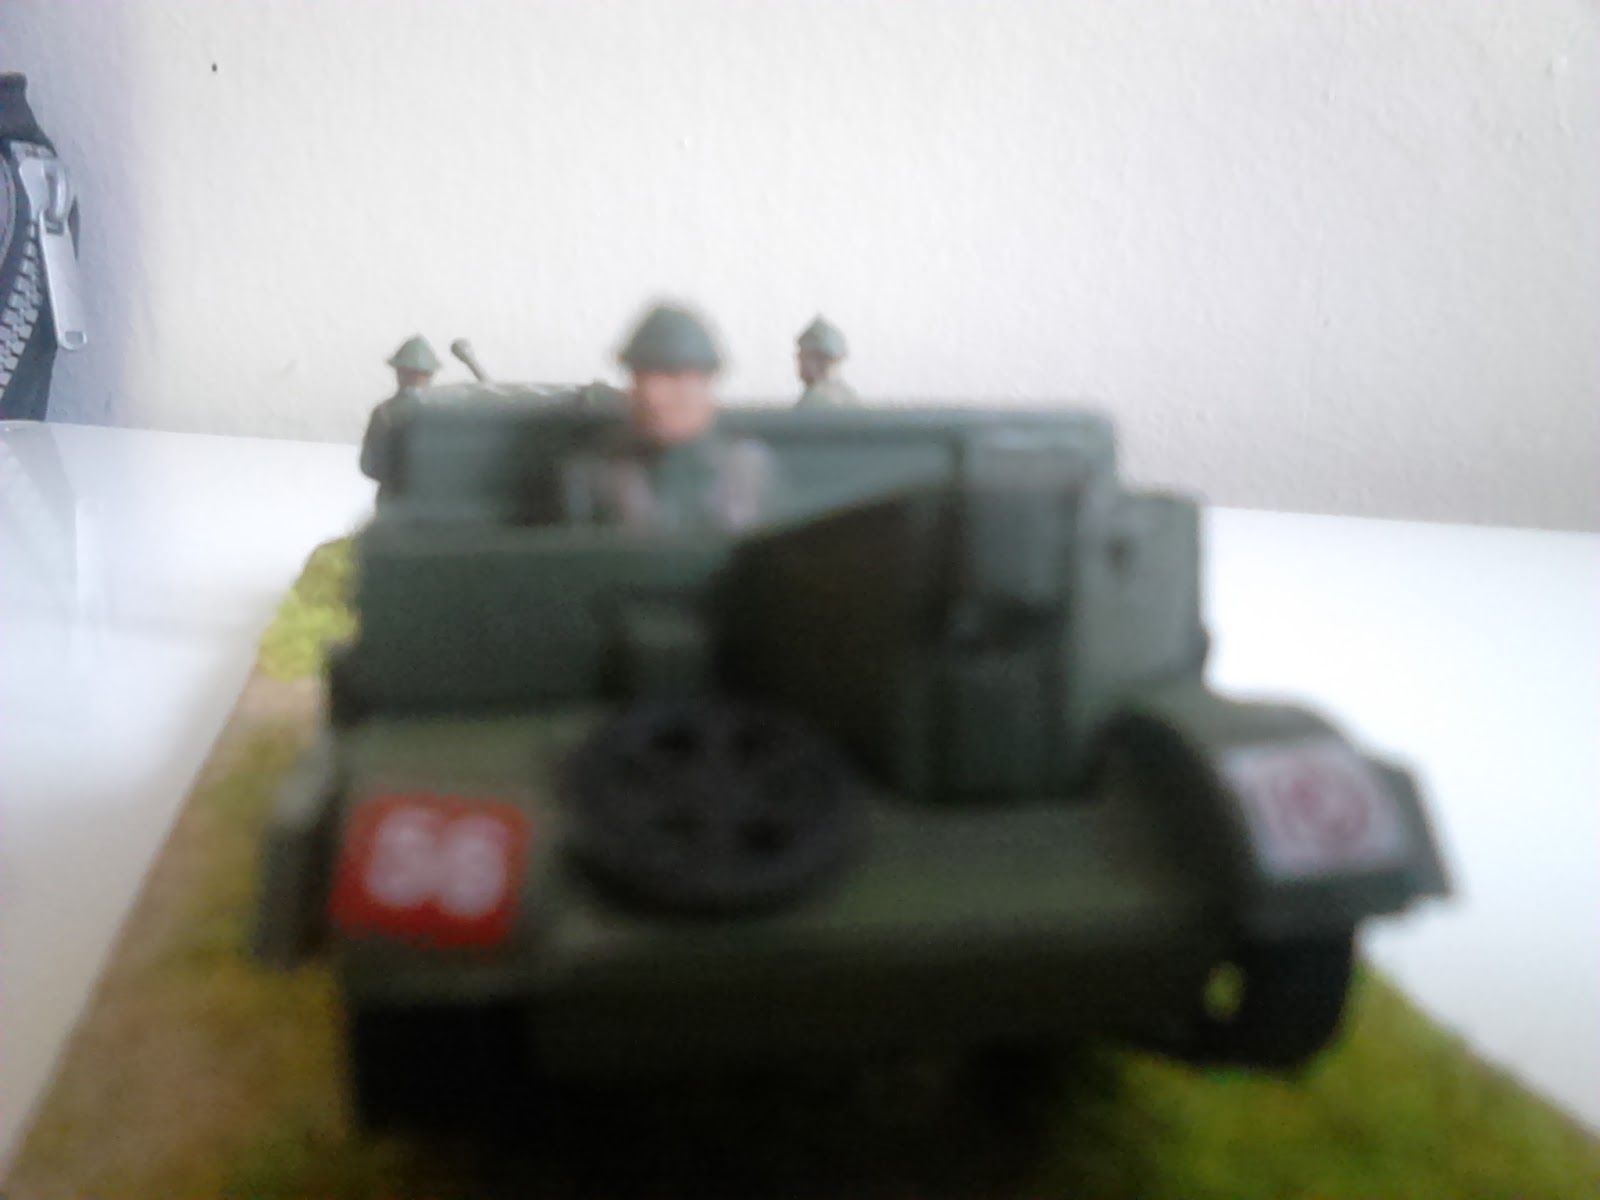
Bren Gun Carrier and 6pdr Anti Tank Gun
Hello everyone! Today I will be reviewing the Airfix Bren Gun carrier and 6pdr Anti Tank Gun. The proper name for the Bren Gun Carrier was the Universal Carrier but was nick-named this because of the light armament on the front. It was a versatile vehicle with 113,000 made by 1960 and being used as things from personnel carriers to towing guns. I have also found out (on Wikipedia, so if I'm wrong please tell me in the comments) that it is the most produced armoured vehicle in military history. After researching the 6pdr Gun I have found its most likely the Ordenance qf 6 pounder 7 Cwt. It was a 57mm gun used mainly by the British in the middle of the war and had a range of 1,650 yards or 1,510 meters.
This is a Airfix 1:76 scale kit costing £5.99 on the Airfix website.
I'm not sure how old this kit is, but from the instructions it looks pretty old. You might also know that when you buy a small Airfix Kit like the 1:76 Landrover (which I'll be reviewing when it's finished), the instructions look old and they normally mean that you build half the kit and you're still on step one. However they were still easy enough to understand.
The detail is not very high though, the Bren Gun Carrier has enough detail but still lacks it to make it stand out. The people have little detail as well and dry brushing was needed to really make the figures look good. It doesn't help that the quality of the plastic is not brilliant, and it's probably a rare occasion but mine warped a bit. One thing I was pleased about was that the tracks came as a solid plastic instead of the dreaded rubber tracks. It would have been impossible for Airfix to make rubber tracks that small, but I liked it anyway (even if it's a pain to get it out of the sprue).
The kit I bought had a figure that needed some cutting up as the bomb he was holding had merged into his knee, this was obviously a fault in the moulding. The kit comes with four figures, two loading the gun, one standing and another driving.
The awkward thing with this kit is the scale though. Unless you can find some 1:76 scale figures or put it just with 1:76 vehicles then this is a stand alone kit.
With that said it's still a good kit to just have on the side as it's a very easy build.
As you can see in the photos I have turned mine into a diorama, using a offcut of Mdf and some modelling grass.
All I do is spread some glue over the bits where I want grass with some paper. I then sprinkle grass over it. The bare Mdf resembles dry dirt, it's possible to spray it but the overall effect looks bad.
Thanks for reading my blog! You can subscribe by email and through blogger on the top left to read my reviews first. Please comment below!


Tuesday, 9 June 2015
Morris Mini Cooper
Hello, today I am going to be reviewing the Tamiya Morris Mini Cooper. This particular version of the Mini came out in 1961, however the story began before as John Cooper, who was a designer and builder of Formula 1 cars, saw the potentional for the Mini to be turned into a Preformance car. But the Designer of the Mini (Alec Issigonis) did not want the Mini turned into a preformance car, So it was up to John Cooper to pursuade Issigonis to turn the Mini from a affordable family saloon to a rally car capaple of wining Monte Carlo 3 times. Cooper eventually pursuaded Issigonis to make turn it into a preformance car, so in 1961 they Collaborated to create the Mini Cooper. This car had 55bhp and twin carburetors and a racing tuned engine as this version of the Mini was designed for Group 2 rallying.
The model that is below is the Tamiya Morris Mini Cooper Rallying, which is currently (at the time of post) £13.95 on Amazon.Co.uk.
I will start of with the instructions, which were a joy to read off. Everything was clear and easily explained as it has been with all the Tamiya models I've built. The quality of the plastic was good and finding everything in the sprues was reasonably easy, but a worryingly large amount of parts were left after I finished my build, however I assume that it is so the model fits with the paint and decal scheme. I was extremely happy though, how the chrome bumpers came already silver so no painting was needed, which I thought was a nice touch.
The kit itself showed a great amount of detail from the gear knob and radio to full suspension and brakes. The kit comes with a full interior and engine bay, with decals for the dashboard. However the instructions recommended that you glue the bonnet shut, so you can't see the engine. I have somehow managed with some half dry glue (I think that's how I did it anyway) so you can open and close it. So far my review of this has been positive as it generally was a very good kit to build. But one area that let this kit down like a crashing plane, was for me the decals. I have had people tell me that Tamiya's decals are not that great (as I usually use Airfix instead) and this kit was no exception. The proper kit has racing decals, so it has stripes and numbers etc. When I tried to apply it to the model it practically disintegrated and were impossible to be maneuvered into place. The small circular one for the dashboard and the numbers for the side were applied fine but I had to remove them and change the paint scheme to a normal red Mini.
Overall this kit is great and I would highly recommend it and could be done to a very high finish.
Some of you may have also noticed that it is on a diorama. I was trying to achieve the effect of a Mini fan looking after his Mini in his garage, with memorabilia on the wall. The brick wall in the background is simply a card lined foam board with bricks cut into it. To make them have a more realistic shape I went over with a pencil. The figure was part of a Fujimi mechanics set, which has been weathered with some to make him look greasy and oily as he's been working on a car. He was meant to be looking at the engine but he was unfortunately too tall so had to open the boot instead. I entered this into a competition at Shropshire Model Show at RAF Cosford in April, but did not bring home a trophy. Thanks for reading and subscribe to my blog by email to hear about my reviews first!
The next kit I should be reviewing is the Airfix 1:76 Bren Gun Carrier


Monday, 8 June 2015
Airfix Engineer Jet Turbine
Hello everyone! Today I am going slightly off the scale model topic, but I am still reviewing a Airfix Kit. This is the Airfix Engineer Jet Turbine. This comes in a range of two which is this kit and a Combustion Engine, Unfortunately I am unsure if Airfix still sell this on their website, but can be found on Amazon for £27.69.
It comes complete with all the Circuit Boards, Screws, parts and a screwdriver. The product should also be able to speed up and down as it comes with a throttle. However the build its self is quite easy, but the instructions are the worst I have ever seen. It is not the normal Instructions booklet like one for a Spitfire or Hurricane but it is in fact a series of Pictures of a man's hand building it (the hand obscures the kit). It does not help that the booklet is in black and white. The actual turbine part of it is quite repetitive to build as its just slotting lots of fans into place. I have also seen Videos on Youtube of it working but after a year I still not have got it to work. However Airfix is the only company that supplies jet turbines of this type (while companies like haynes make combustion engines), and the concept of it is very good as it appeals to people like me an of course that is why I bought it in the first place, it's just in my view Airfix need to refine the kit. However I'm sure it's quite easy to do, so if you own this kit feel free to put a picture or a link to a video in the comments. The next model I plan to do is the tamiya morris mini cooper and thanks for reading!
Saturday, 6 June 2015
Supermarine Spitfire MK.IXC
Obliviously I cannot do a model blog without reviewing the Spitfire. The Spitfire MK.IXC was developed to counteract the Luftwaffe Fw 190. This was the most popular variant of the spitfire with 5,500 built and was issued to two units in 1942. It has a top speed of 415 miles per hour,2 20mm cannons and two 7.7mm machine guns. The MK.IXC had better maneuverability than any of the other spitfire variants. It later helped the RAF keep control of the English Channel and became one of the RAF's most used fighters near the end of the war.
The model I have built is another 1:72 Airfix version. It costs £7.99.
However this Airfix kit is not very detailed. The cockpit consists of no detail and does not have any decal for the instruments (However it does include a HUD), there is no raised details on the walls and the seat is just simple seat and is not the proper sort of rounded seat. The rest of the model has sufficient detail and the panel lines on the underside of the wing show even without enamel washes. The model comes with two different painting options both with lots of decals for each. There is a grey and dark green camouflage scheme and a brown and dark brown camouflage scheme. I chose the grey and dark green camouflage scheme and one decal is a yellow line which goes on the edge of the wing. However it is nearly impossible for it to go properly on to the wing so instead I painted it on with yellow paint. It is the same with the small red boxes that go around the guns. Which I also painted on. With this kit I decided to have a open cockpit. Some cockpits come in separate pieces but this came all in one which made it difficult for it to have a open cockpit. Unfortunately I ended up with wonky cockpit pieces while cutting it. However the fuselage was quite thick as well so it was difficult to open the door. Overall it leads to a nice Airfix kit but it still could do with a lot more detail. Thanks for reading my review.


Curtiss p-40b Warhawk and Mitsibushi A6M Zero
Hello again!
In this post I am going to talk about the two planes mentioned in the title. This is in commemoration of the Japanese attack on pearl harbor on the 7th of December 1941. The attack lasted two hours where the Japanese destroyed 20 ships, 200 US airplanes and killed 2,000 US soldiers while wounding another 1,000. The next day President Franklin D. Roosevelt called for a vote in congress whether to declare war on Japan. Congress agreed and three days later Germany and Italy declared war on the US as well. The US Curtiss p-40b Warhawk is thought by many to be one of the most important fighters in early world war 2. 13,738 were produced and were owned by the USAF, RAF, the French Air Force and the Soviets. However the Warhawk was later surpassed by the Grumman F6F Hellcat and the F4U Corsair. The Mitsubishi A6M Zero on the other hand was a symbol of the power of Japans naval forces. The Zero was famous for its maneuverability and it being the first ship based plane to be able to surpass land based aircraft.
These two planes come by Airfix in Dogfight Doubles set and comes at a very reasonable price of £17.99 as the set has two planes and it a gift set (So it includes paints,glue, brushes and in this case a stand).
First I will talk about the Curitss Warhawk. The instructions involve the old tooling and the instructions look complicated at first glance due to lots of options. It also needs a lot of painting before construction. All the pieces fit together neatly and I did not have to use any model filler, however to give it a better finish model filler may have to be used. It is just the scale but I have personally always thought that the Curtiss Hawk looks a bit out of proportion with a very large cockpit. The model is covered in panel lines especially on the bottom of the wings (which is why the instructions look complicated), which enamel washes would work well with. I decided to not do any weathering on the model though.


The Mitsubishi Zero has a very detailed cockpit and in fact has 3 decals for the instrument panel. The plane also has the option to become a fighter bomber if you choose to add a bomb, there are also options for the wingtips to be bent and a choice to drill for a stand. However I did not need any model filler. The weird thing with the Mitsubishi Zero is that the front of the plane is separate from the rest of the fuselage, however it does look fine when it's joined to the fuselage. Even though the paint scheme is quite simple with only a few large decals, it looks brilliant when they are all on. I have also hung it from the ceiling in a dive bomb position which give a nice look even with no weathering.

Thanks again for reading my Blog!
Hawker Hurricane
In this post I am going to talk about the hawker Hurricane mk1. I have built 6 1:72 scale hawker hurricanes and one 1:24 scale hurricane that is in progress. The hawker Hurricane was a fighter plane that was used from the start of the world war 2 to the end of the war in a variety of roles, such as from naval usage to sometimes being used as reconnaissance. The Hurricane also served with not just the RAF but also with air forces around the world. It served in the Battle of Britain and actually shot down more German Planes than the Spitfire. The hurricane was different to many world war 2 fighters as the back of the fuselage was still made out of canvas, like the fighters of world war 1. The Hurricane had the same engine as the spitfire (Rolls Royce Merlin V12 Super Cooled Engine) and it was the the first RAF plane to go over 300mph.
The model I built is the Airfix 1:72 scale which costs £7.99. This particular model I finished in a Royal Belgian Air force decal scheme, however it does come with a option for the 111 RAF squadron.
The instructions are fairly simple as Airfix have introduced new tooling. But there is one piece in the gear compartment where a small box should go, however it is extremely hard to put in in place if you follow the instructions. The rest of the piece came together easily and only a small amount of model filler was needed at the front of the plane and where the fuselage joins to the wings. The kit was also very easy to assemble, but I found a lot of painting was needed to be done before some parts were fitted together. I also chose to weather this model by adding chipped paint on some of the panels and by adding Humbrol smoke weathering powder to the guns and to the exhaust. For a finishing touch I left the canopy roof open so you can see the Pilot and instruments.
Overall this is a very easy kit to build and the kit comes with a great amount of detail. Thanks for reading!


Hello everyone!
Hello, my name is Rhodri. I have been modelling for several years now but my models have been in my room where nobody can see them. I mainly build planes and the odd dioramas and cars.


 In these blogs I hope to give reviews and pictures of all my models. Thank you to everyone who's going to read my blog


Subscribe to:
Comments (Atom)